Integrating Datasentinel with FastAPI
Boosting Postgresql Performance with Datasentinel and FastAPI: A Step-by-Step Guide
As data-driven applications continue to grow in complexity and scale, efficient database management is becoming increasingly important. For Postgresql users, this means ensuring optimal database performance through monitoring and tuning. However, without the right tools and strategies, identifying performance issues and implementing optimizations can be a challenging task.
This is where Datasentinel and FastAPI come in. Datasentinel is a powerful Postgresql monitoring tool that can help you track database performance metrics and identify potential bottlenecks.
FastAPI is a modern web framework that allows you to build high-performance APIs with minimal code. Together, these two tools can provide an effective solution for optimizing Postgresql performance.
In this blog post, we’ll show you how to integrate Datasentinel with FastAPI to monitor your Postgresql database and identify areas for improvement. We’ll cover everything from installing Datasentinel agent and setting up the integration with FastAPI to putting you on track with the Datasentinel dashboard to start troubleshooting your own database’s performance metrics and implementing optimizations.
By the end of this guide, you’ll have a clear understanding of how to maximize your Postgresql performance with Datasentinel and FastAPI.
Installing Datasentinel for Postgresql
Before we can start integrating Datasentinel with FastAPI, we need to install and configure the Datasentinel agent. Here’s a step-by-step guide to help you get started with the CLI agent:
1. Downloading the agent
The agent can be downloaded locally or through a docker image. Today, we’re going to download the local version. You can take a look at the different versions of the Datasentinel agent from this page based on your operating system distribution.
In my case, I would choose a buster version.
2. Configuring the Datasentinel agent
After downloading the Datasentinel agent, you’ll need to decompress the tar file and configure the executable file so that we can start the agent.
This can be done by the following:
tar xvzf datasentinel-agent-debian-buster-latest.tar.gz
export DATASENTINEL_PATH="`pwd`/datasentinel"
export LD_LIBRARY_PATH=$DATASENTINEL_PATH/lib
export PATH=$DATASENTINEL_PATH:$PATH
Here is a breakdown:
- tar xvzf datasentinel-agent-debian-buster-latest.tar.gz Extracts the Datasentinel archive file. The archive file typically contains the Datasentinel binaries and libraries.
- export DATASENTINEL_PATH=“pwd/datasentinel” Sets the DATASENTINEL_PATH environment variable to the path of the Datasentinel directory. The command achieves this by using the pwd command to get the current working directory and then appending the datasentinel directory to it.
- export LD_LIBRARY_PATH=$DATASENTINEL_PATH/lib
Sets the LD_LIBRARY_PATH environment variable to the path of the Datasentinel libraries directory. This variable is used by the system to locate Datasentinel libraries at runtime. - export PATH=$DATASENTINEL_PATH:$PATH Adds the Datasentinel directory to the PATH environment variable. This allows you to run Datasentinel commands from anywhere in the system without specifying the full path.
It’s recommended to keep the three environment variables above stored in a system-wide config file like ~/.bashrc so that you don’t have to call these commands in every shell session. So copy and paste the export command lines in there and make sure to replace pwd with the absolute path of the directory that has the downloaded datasentinel.
If you do not wish to set the LD_LIBRARY_PATH and PATH env variables, you can use an alias as shown in the documentation
3. Start Datasentinel agent
Now that you’ve configured Datasentinel on your terminal, you can start the agent by running the following command: datasentinel start agent
4. Log in to the Datasentinel Platform
Datasentinel provides a comprehensive view of your PostgreSQL environment, which can be utilized either on-premises or through a Software as a Service (SaaS) model.
To use the Datasentinel platform, you can request a free 30-day trial on the Datasentinel website.
Put your email in the email text box and you will receive an email with the connection details.
The connection details contain the following:
- A url on datasentinel domain to log in
- A username
- A password
- A license (aka, a token)
Copy the token because you’ll need it when configuring our CLI agent. Open your terminal and write the following command:
export DATASENTINEL_TOKEN=<past-here-the-token>Make sure that the DATASENTINEL_TOKEN variable is stored correctly, by echoing it to the console:
echo $DATASENTINEL_TOKENIt’s also recommended to keep this environment variable stored in a system-wide config file like ~/.bashrc. So copy and paste the export command line in there.
Integrating Datasentinel with FastAPI
Integrating Datasentinel with FastAPI is a straightforward process that allows you to monitor your PostgreSQL database with ease. We will set up endpoints for getting insights about the agent status, setting the server, adding a connection to an existing PostgreSQL database, and showing the connections on the Datasentinel platform.
Create a new main.py file that will contain all the endpoints.
For most endpoints, you will need the API token to authenticate your requests to the API agent so the following datasentinel_token object is what you’re going to pass inside these API methods:
import os

datasentinel_token = os.getenv("DATASENTINEL_TOKEN")
We used the os.getenv function to retrieve the token from the DATASENTINEL_TOKEN environment variable.
Next, you need to define the base URL for the Datasentinel API. The URL depends on your Datasentinel instance’s location and port. In the following code snippet, we define the base URL as https://localhost:8282:
base_url = "https://localhost:8282"localhost because we’re running the datasentinel CLI agent locally, and 8282 because this is the default port that the agent API listens to.
Creating your first FastAPI app
Now, let’s run a very basic FastAPI app with a single endpoint in the same main.py file:
from fastapi import FastAPI

app = FastAPI()

@app.get("/")
async def index():
    return "Hello world!"
The index endpoint shown above should return the string “Hello world!” when you access the root URL of the application.
Here’s a brief explanation of each line of the code:
- from fastapi import FastAPI
This line imports the FastAPI class, which we use to create a new FastAPI application. - app = FastAPI()
This line creates a new instance of the FastAPI class and assigns it to the app variable. - @app.get("/")
This is a decorator that tells FastAPI to associate the index function with the root URL of the application ("/"). - async def index()
This line defines the index function as an asynchronous function using the async keyword. It doesn’t take any arguments and simply returns the string “Hello world!”.
Before running this code, you need to install the dependencies.
Create a requirements.txt file and add the following:
requests
fastapi
uvicorn
We will need:
- requests: for making HTTP requests.
- fastapi: for building the APIs.
- uvicorn: for the ASGI (Asynchronous Server Gateway Interface) server for Python 3 which is the default server used by FastAPI.
To install these dependencies, first create a new virtual environment:
python3 -m venv venv; . venv/bin/activate; pip install --upgrade pipand then install the requirements:
pip install -r requirements.txtYou can then run your FastAPI app with the following command:
uvicorn main:app --reloadThis URL: localhost:8000.
FastAPI provides automatic documentation built by Swagger for your API endpoints.
At the end of this guide, you’ll be able to create the following endpoints:

Under each endpoint, you’ll find a button called “Try it out”. You can click on it and then click on the “Execute” button to send the specified request. You’ll also find the request as well as the response bodies.
Getting Datasentinel agent status
The Datasentinel agent should now be running, so let’s get the status of it to make sure everything is okay:
import requests
import json
from fastapi.responses import JSONResponse

@app.get("/status")
async def get_agent_status():
    url = f"{base_url}/api/agent/status"
    response = requests.get(url, verify=False)
    content = json.loads(response.content)
    return JSONResponse(content)
This code defines an endpoint in a FastAPI application that responds to HTTP GET requests sent to the “/status” path. The purpose of this endpoint is to retrieve the status of a Datasentinel agent using the Datasentinel API through FastAPI.
Here’s a breakdown of the code:
- We starting with importing the requests and json libraries. And then import JSONResponse class which is used to return JSON-encoded responses from FastAPI endpoints.
- @app.get("/status")
This is a decorator that tells FastAPI to associate the get_agent_status function with the HTTP GET method and the “/status” path. - url = f"{base_url}/api/agent/status"
to construct the URL for the API agent endpoint that retrieves the agent status. - response = requests.get(url, verify=False)
to send an HTTP GET request to the API agent using the requests library and store the response object in the response variable. The verify parameter is set to False, which disables SSL certificate validation. This is typically done for testing or development purposes when using a self-signed SSL certificate or when the server’s SSL certificate cannot be validated due to a missing or invalid chain of trust. - content = json.loads(response.content)
to decode the response content from JSON format to a Python object using the json library and store it in the content variable. - return JSONResponse(content)
to return a JSONResponse object with the decoded response content as the payload. This response will be sent to the client that made the HTTP request to the /status endpoint.
Setting Datasentinel server
In this section, we will connect the Datasentinel local agent with the Datasentinel SaaS platform.
That’s why we need to set up the Datasentinel server through a FastAPI endpoint:
@app.put("/set-server")
async def set_server():
    url = f"{base_url}/api/server"
    headers = {"api-token": datasentinel_token}
    data = {
        "host": "51.158.123.254",
        "port": 443
        }
    response = requests.put(url, headers=headers, json=data, verify=False)
    content = json.loads(response.content)
    return JSONResponse(content)
The set_server() function is an API endpoint that listens for a PUT request on the /set-server URL path. When this endpoint is called, it sends a PUT request to the Datasentinel server API at the specified URL (https://localhost:8282/api/server) with the provided authentication (api-token header) and a JSON payload containing the IP address (or the server’s hostname) and port number.
In the code provided, the IP address is set to “51.158.123.254” and the port number is set to 443. However, these values can be adjusted to match the actual IP address (or hostname) and port number of your Datasentinel server.
Once the server is successfully set up, the API response is returned as a JSON object using the JSONResponse() function provided by the FastAPI library.
Connecting Datasentinel with a PostgreSQL database
To connect to a PostgreSQL database and start monitoring your own databases, you need to have three requirements:
- A user that have specific privileges
- The pg_hba.conf file is configured correctly
- pg_stat_statements extension is installed
Let’s take it step by step:
1. Creating a PostgreSQL user with specific privileges
You need to create a new user in PostgreSQL with the appropriate privileges necessary for Datasentinel to perform its monitoring tasks.
For PostgreSQL versions 9.2 to 9.6, the user must have the role superuser in order to be able to perform the required monitoring tasks.
Therefore, the commands are shown below:
CREATE USER datasentinel PASSWORD 'db_password';
ALTER USER datasentinel WITH superuser;
which creates a new user ‘datasentinel’ with a password and grant the superuser role to it.
For PostgreSQL versions 10 to 13, the required privileges are pg_monitor, pg_read_all_settings, and pg_read_all_stats.
Therefore, the commands are shown below:
CREATE USER datasentinel PASSWORD 'db_password';
GRANT pg_monitor,pg_read_all_settings,pg_read_all_stats TO datasentinel;
which creates a new user ‘datasentinel’ with a password and grant the required privileges to it.
2. Configuring the pg_hba.conf file
The pg_hba.conf file is a PostgreSQL configuration file that controls client authentication. The location of this file may vary depending on how you installed PostgreSQL and what operating system you are using. Here is a simple way to know where the pg_hba.conf file is located on your system.
Open your SQL client (e.g. psql) and enter the following:
postgres=# SHOW hba_file;
              hba_file
-------------------------------------
 /etc/postgresql/12/main/pg_hba.conf
(1 row)
You’ll see a similar path to this pg_hba.conf. Then you can open it with sudo followed by your favorite editor (could be vim) and add the following:
# TYPE  DATABASE        USER            ADDRESS                 METHOD
host    all         datasentinel    127.0.0.1/0             md5
The line shown above specifies an entry in the file that grants access to the ‘datasentinel’ user. The user is allowed to connect from the local machine (127.0.0.1) using the md5 authentication method.
You can replace the “unix_db” database with your own. Or if you want this user to have access to all your databases, you can replace it with all keyword. Also, feel free to change the user name and the address based on your preferences.
3. Installing pg_stat_statements PostgreSQL extension
Datasentinel requires pg_stat_statements extension to be installed. If you want to know how to install it on your PostgreSQL cluster, you can follow the beginning of pg_stat_statements tutorial.
Adding a connection to PostgreSQL
Now, you’re ready to add a connection to a PostgreSQL database:
@app.post("/add-connection/{connection_name}")
async def add_connection(connection_name):
    url = f"{base_url}/api/connections/{connection_name}"
    headers = {"api-token": datasentinel_token}
    data = {
        "host": "localhost",
        "port": 5432,
        "user": "datasentinel",
        "password": "db_password",
        "tags": "application=application_name,environment=application_type,datacenter=datacenter"
    }

    response = requests.post(url, headers=headers, json=data, verify=False)
    content = json.loads(response.content)
    return JSONResponse(content)
This endpoint is responsible for adding a new connection to Datasentinel platform. The connection represents a PostgreSQL database instance that Datasentinel will monitor.
Here’s an explanation of the endpoint:
- @app.post("/add-connection/{connection_name}")
This endpoint is an HTTP POST request and expects a parameter {connection_name} in the URL path, which represents the name of the connection to be added. - url = f"{base_url}/api/connections/{connection_name}"
The url variable is the URL to send the POST request to. The connection_name parameter is used in the URL to specify the name of the connection to be added. - headers = {“api-token”: datasentinel_token}
This is the header of the request and contains the API token required to authenticate with the Datasentinel platform. - data = { … }
The data variable contains a dictionary with the connection details. It includes the host and port of the database instance, the username and password to connect to the database, and some tags to identify the connection on the platform. - response = requests.post(url, headers=headers, json=data, verify=False)
This line sends the HTTP POST request to the Datasentinel platform with the connection details. The verify=False parameter is used to disable SSL verification as shown previously.
Once you send this request through Swagger and you enter a specific name for the connection (in our case, we enter unix_connection as the name of the connection), you’ll receive a success response:
{
  "status": "Connection created and connected!"
}
To verify that the connection is done, you can go to the Datasentinel URL sent to you over email that shows the dashboard:
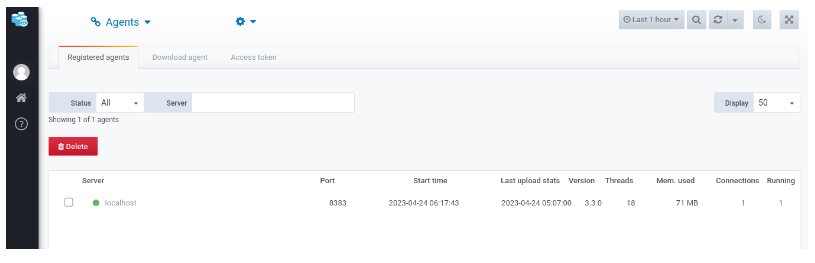
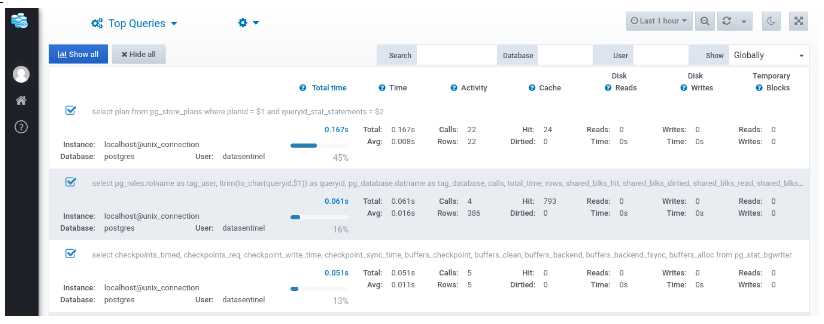
As you can see, the localhost is connected successfully. You can also navigate to the Datasentinel features like the Top Queries:
Showing Datasentinel connections
You can even further verify what’s currently connected on Datasentinel from the following FastAPI endpoint:
@app.get("/connections")
async def show_connections():
    headers = {"api-token": datasentinel_token}
    url = f"{base_url}/api/connections"
    response = requests.get(url, headers=headers, verify=False)
    content = json.loads(response.content)
    return JSONResponse(content)
The show_connections function is defined with the @app.get decorator which maps the endpoint to the /connections path. The function sends a GET request to the Datasentinel API’s /api/connections endpoint, passing the api-token header for authentication. The response is then loaded as a JSON object using the json.loads() method and returned as a JSONResponse object.
In our case, when you send this request, you’ll find a response like the following:
[
  {
    "name": "unix_connection",
    "host": "localhost",
    "port": 5432,
    "user": "datasentinel",
    "password": "db_password",
    "tags": "application=application_name,environment=application_type,datacenter=datacenter",
    "enabled": true,
    "connected": true,
    "collection-rate": "low",
    "samples": false,
    "lock-monitoring": true,
    "lock-monitoring-delay": 30,
    "table-monitoring": true,
    "query-monitoring": true,
    "query-monitoring-optimize": false,
    "query-monitoring-min-calls": 2,
    "query-monitoring-min-time": 1
  }
]
Stopping Datasentinel agent
Finally, when you no longer use Datasentinel, you need to stop the agent.
You can do that with the CLI agent:
datasentinel stop agent